This is an old revision of the document!
Table of Contents
LASER CUTTER
Quelab is pleased to offer to its members access to a 80 watt CO2 infrared laser cutter.

Authorized Users
This is a RED level tool, and requires additional training, and is available to members-only
Only authorized users are permitted to use the laser! To become an authorized user, you must be trained by one of the Authorized Trainers.
Operation
Head over to Laser Operations for laser usage and procedures.
Scheduling Time on the Laser Cutters
We use a shared Google Calendar to reserve time on the cutter. See Laser Cutter Reservations for detailed information.
Configuration/Calibration Tips
The mechanical stops at the bottom of the Y-axis in their current position are really, really, really easy to crash into. Especially during [TEST] if you're off a bit on material placement. Be warned.
To tighten the second pulley for the X-axis stepper (the larger pulley on the end of the small belt that goes right to the stepper pinion), you need to remove the small timing belt – the set screw for the big pulley is beneath the timing belt (on the edge of the pulley) so you can't see it. Thanks to Ray for pointing this out. To remove the small belt, which is very tight, open the right side top access cover of the cutter. The X stepper is mounted to a black plate which has 4 vertical screws in slots (tension adjuster). Loosen those and the belt slips right off, then the set screw in the big pulley can be tightened.
File Formats
The Lasercut application will directly import Illustrator 7 files (be sure to convert all fonts to outlines and be sure that ruler units are set to mm). Note that if you name your layers “cut” and “engrave”, even if you have more than one layer named “cut” or “engrave”, Lasercut will respect those layers names and maintain your layers when importing.
The Lasercut application will directly import DXF version 12 files and lower. DXF is a CAD format. Some versions of Illustrator will export to this format, as will most CAD programs, and a slew of open-source drawing/painting programs.
PNG and JPG files can be directly imported for engraving only.
Troubleshooting Tips & Info
Other than a problem with the tube or HV power supply (should be the last things we suspect), things that can cause the laser not to fire:
- Setting “Power” to 10
- There is a bug in the LaserCut software; when you set power to 10, the laser will not fire, even though the carriage moves as during a normal cut.
- Misalignment of the optics:
- Install the alignment cross hair adapter with some thermal paper and see if the laser can mark it and if the mark is in the center of the cross hairs. If that doesn't work, take a piece of thermal paper and place in front of the laser (you may need to tape it) and see if the laser marks it.
- Very dirty optics:
- If the optics (the lens on the cutting head) is really dirty then the laser may appear not to fire. Install the alignment cross hair adapter with some thermal paper and see if the laser can mark it. The optics are probably due for a cleaning anyway.
- Lid switch misadjusted so the magnet is not triggering the switch:
- I had to adjust this when we first got the machine. The only way I got it to trigger was to have the switch as a rather sharp angle. If someone readjusted this switch to an angle that looks more reasonable (or is came loose), then it would not trigger and the laser would not fire.
- Water flow sensor not working or water not actually flowing
- Are we certain that the water pump is still working? Do we get water flowing outfrom the laser tube back into the water bucket? If so, I believe the water flow sensor will output pulses as it turns as the water flows.
- Also (depending on the design of the water flow sensor) you may be able to see it turn through a clear panel on the sensor. The sensor is in the far left rear inside the machine. Unplug the cutter from the AC mains before crawling in there so you won't get hit by the laser through the honeycomb bed.
- Loose wires:
- Check the wires going to and from the HV power supply and to the laser tube. Any other wires that may have come loose. Note that the HV side of the power supply and the connections to the tube may have high voltage present even if we think the laser is off. Use appropriate caution - check with the system unplugged from AC mains.
- Being that the meter show 0mA, that knocks out issues with the optics and leaves the lid switch and the water flow sensor, and possibly the HV power supply, and far less likely the tube. I say less likely and the laser should just get weaker and weaker if it was going out.. Also the meter will only register during actual cutting. It will not move if you only pulse the laser with the button on the control panel.
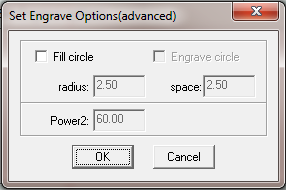
- HELP! I see circles instead of a solid engraving!
- Someone set the advanced engraving option “Fill Circle”. Uncheck the box to turn it off.

Links/Resources
- LaserCut Software related:
- http://grahamwideman.wikispaces.com/Laser+cutter+--+LaserCut+software documentation install issues/workarounds for Leetro Lasercut based machines. (links to some API info for tinkerers)
- http://www.leetro.com/english/down/59.html manual and lasercut 5.3 installer downloads.
- Web Apps & plugins that can help:
- Box Maker: boxmaker.connectionlab.org
- Automatic lasercut notched six-sided box generator. A little primitive, but if you don't have – or want to spend – the time figuring out all the notches for a simple box, this can be pretty nifty. It let's you plug in material thickness and basic notch parameters. It's also a neat way to see how this technique looks if it's a new method for you.
- Box Maker extension for Inkscape. Has versions for both version .48 & .91 - http://www.keppel.demon.co.uk/111000/111000.html
- That link is now dead; here is a zip file from the unofficial source, https://github.com/hellerbarde/inkscape-boxmake
- http://www.makercase.com/ another box maker. This one can do flat edges, finger joints or T-Slot edges!
- Member Margaret showed me another box maker web app: MakeABox.io
- http://climbers.net/sbc/make-laser-cut-case-elastic-clips/ has a laser cut box with CLIPS that can latch the box shut!
- https://productrealization.stanford.edu/resources/processes/laser-cutting - this page has some nice sample projects to cut - a T-Rex to get started with, a basic box demonstrating tabbed box construction, and a teeny led lamp showing curving materials with a series of slits, as well as using captured nuts with screws for joinery.